I am sharing these must know camera settings for video editing beginners as part of my video editing for amateurs by an amateur series because there were so many camera settings that I JUST know have begun to understand despite doing videos for a few years.
Attending the Black Film Space Weekend has made me want to pass on this knowledge as I continue to learn and grow. Because I do believe that if I can learn this, so can you. I’ve posted more information on instagram here and youtube about this here but this blog is giving my written format
Use Manual Instead Of Auto
I was shooting in auto for so long because I didn’t trust myself. I thought auto made the most sense. Right? Let the camera decide what it thought was right but boyyy was I so wrong. My photography friend taught me so much in Chicago and explained the usefulness of shooting in manual. When I shoot in manual then I am able to have control over the features myself which is way better in the long run.
Shoot In Log
Another thing I did for a long time was shoot in the video’s regular format instead of shooting in log. Then I would color grade on top of it but be confused why my vidoes still didn’t look like that great.
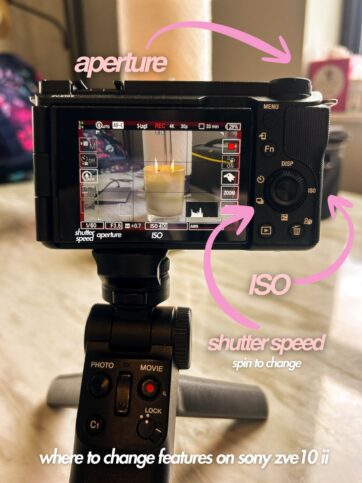
Shooting in Log was a game changer. You can search online how to film in log depending on the camera you have. I have the Sony ZVE10 so in my youtube I showed how I found log on my camera. Basically log gives you a lot more freedom when it comes to color grading which can also make the color grading process easier.
My favorite color grading tutorial is by lacapturevisuals here because she explains more details about log and how to color grade with it. As I mentioned in the video, first of all you would shoot in log, then add a LUT package that converts log to the camera setting. For example for me, I convert it to Sony SLog3 Cine then I add another Lut Package that adds a premade color grading effect. I share more details about this on my instagram carousel here
Shutter Speed
Shutter Speed is basically motion blur and it shows up on the camera as 1 divided by a number. The lower the bottom number, the more slow the motion.You want the shutter speed to be double your frames per second/fps. The two ideal frames per second is 24 fps and 30 fps. For me, I usually keep my shutter speed on 30 fps so my shutter speed stays at 1/60
Aperture
Aperture is how much light is coming through the lens and on a camera it is a number beside the letter f. For example, oftentimes when I shoot indoors and doing sit down videos to blur the background more my aperture is f3.5. But if I want a darker image or landscape shots where I am seeing the background, I can I increase my aperture to a number like f6.3.
ISO
ISO is a measure of brightness. This can be tricky because ideally you want your ISO to be a lower number as possible but that varies depending on where you are shooting. Because the higher the ISO, the brighter the image but also you begin to introduce a lot of grain into your image.
For example, when I shoot indoors, I am trying to keep a lower ISO BUT I also want enough brightness so I am putting my ISO higher at 800 oftentimes. But if I were to shoot outside, I would want a much lower ISO since it would already be bright outside and don’t want my video to be too bright.
I hope these MUST KNOW Camera Settings For Video Editing Beginners helps you on your journey of figuring out how to use your camera to start video editing 🙂 have fun editing!